Flat Roof Repair – How to Spot Common Problems

Denver Flat Roof Repair is necessary if you see areas of wear and tear, leak, or notice your energy bills increasing. Leaks are especially problematic as water entering a flat roof can rot the wood framework underneath.

Depending on your roof type, you might need rubber roof patches, roofing tar or a membrane to reseal it. Practice safety with ladders and work on a dry roof when possible.

Flat roofs have become popular for homes and businesses because of their sleek appearance, cost-efficiency, and durability. But they’re not immune to damage, and spotting problems early can prevent more expensive repairs later. Here are some of the most common flat roof repair issues and how to spot them.

Water spots on the ceiling are one of the most obvious signs that a flat roof is damaged and needs repair. If they’re large, discolored, or appear after a heavy rain, the roof may be leaking. In some cases, a leaky flat roof can cause mold and vegetation to grow inside the building, which can be hazardous to health.

Leaks in a flat roof can also lead to rusting and instability, so it’s important to address them as soon as possible. Even a small amount of water can cause damage to the wood framework underneath, leading to expensive repairs down the road.

Because flat roofs often have a slight slope to help drain water, they can collect debris and organic material. Regular roof maintenance can help minimize these issues, but this isn’t always enough. If the structure of a flat roof is already compromised, you may need to consider replacing it altogether.

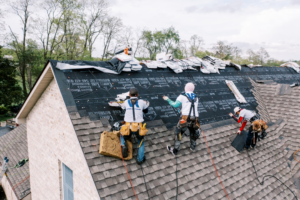
While a flat roof can be easily maintained by a homeowner, it’s usually best to leave more serious issues with a professional. They can have the necessary tools, equipment, and experience to handle more extensive repairs safely and efficiently.

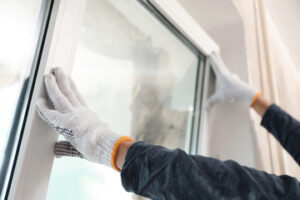
Before beginning a flat roof repair, it’s essential to make sure you have the proper safety gear. A ladder, protective equipment, and a harness are all vital for working on a roof. It’s also important to understand the difference between different types of flat roofing materials, as they require different repair methods.

Once you have all the tools and safety gear, it’s time to start identifying the source of the leak. First, you’ll want to clean the area thoroughly and dry it completely. Next, you’ll need to find the exact location of the leak by going indoors and taking note of where water is dripping or the drywall or roof decking is discolored. Once you know the exact area of the roof where the leak is coming from, it’s easier to repair.

Seal Small Cracks and Holes

Although flat roofs add a sleek aesthetic to buildings, they are susceptible to leaks and weather damage. Regular inspections and swift action on warning signs are essential for keeping a flat roof in good condition. Water stains on the ceiling or damp areas are an indication of problems, as are puddles on the roof surface and increased energy bills. The severity of any issues depends on the type of roofing and weather conditions.

A commercial flat roof is a complex system that has many components, including the roof membrane, flashings, and deck. The roof is a key part of any building, and it is exposed to extreme heat and weather conditions. This exposure causes wear and tear on the roof, which can result in punctures, rips, tears, cracking, and leaking.

Even small cracks and holes in a flat roof can lead to expensive repair bills, and they should be dealt with as soon as possible. These cracks provide pathways for water to enter the building and cause further damage. The best way to repair these small cracks and holes is with roofing cement. This type of sealant is safe for use on all types of flat roofs, and it can be purchased at any home improvement store.

In addition to sealing small cracks and holes, a flat roof should be inspected for blistered spots. Blistering is an indication that the roof has been damaged by heat and pressure. It’s also a sign that the roof is aging and is in need of replacement.

Blistering can be prevented by performing a roof patch repair, which is usually easier and less costly than replacing the whole roof. This process involves slicing open the blistered area, flattening the membrane, applying roofing cement, and covering it with a fiberglass mesh layer. This will help prevent sun damage and keep the flat roof waterproof.

Another method to fix small cracks and holes in a flat rooftop is with the use of roof patches. These patches are available in kits and can be easily installed on SBS, EPDM, or TPO flat roofs. The first step in using a patch is to clean the area around the damaged spot, which helps ensure good adhesion of the cement. Once the area has been cleaned, the patch should be cut to size and spread with roofing cement. It’s important to spread the cement at least six inches past the damaged area, as this will ensure that the roof is fully sealed and protected.

Use Roof Patches

A flat roof is designed with a slight slope to help with water runoff. However, if the membrane is damaged or there are depressions on the surface, water can pool and eventually leak into the home. This is often a sign of deteriorated seals, which can be fixed using a roof sealant that’s compatible with the type of roofing material (SBS, EPDM, TPO or built-up). In addition to repairing these leaking areas, the surface of the roof should be inspected for other trouble spots. These include pebbles, twigs or debris that can cause a clog, and rust on flashing or fasteners.

In the event of a large hole, it’s best to hire a professional for the flat roof repair. If the damage is extensive, it’s likely that the entire roof will need to be replaced and resealed. However, if the roof is only a few years old, it may be more cost-effective to have a contractor patch a couple of holes.

If you want to tackle the job yourself, be sure to have a ladder that’s tall enough and a good pair of gloves. The roof may be slippery, and working on a flat roof is always more challenging than on a pitched one. In addition, it’s a good idea to wear a fall prevention harness, as falling from the roof can be fatal.

Begin by clearing the area around the damaged spot. Brush away any debris like twigs and pebbles, and clean the area with cotton rags dampened with mineral spirits. Then apply a layer of roofing cement about 1/8 inch thick and spread it at least six inches beyond the edge of the damage.

Once the cement dries, cut a piece of wet patch that’s the same size as the damaged area and place it over it. Apply a second layer of wet patch, making sure it extends at least two inches over the first. This double patching adds strength and resilience to the damaged area and improves water resistance.

Immediately after the wet patch dries, smooth it with a putty knife. Once it’s level and even with the surrounding surface, add a coating of sealant to the top of the patch. This will help the patch to adhere to the roof and prevent it from lifting or peeling over time.

Reseal

Flat roofs lack a slope, making them more susceptible to leaks than their pitched counterparts. When a leak occurs, it can soak insulation and decking material, weakening the structure beneath and allowing water to seep into the building’s interior. It’s important to identify the leak’s origin and make repairs quickly to limit damage.

Finding the leak’s source can be difficult, but there are some signs to look for: water pools after rain, a visible crack or blister in the roofing material and damp spots on the ceiling or walls. If you notice any of these, it’s time to repair the flat roof.

Before starting, it’s important to understand the different types of flat roofs and the materials used to construct them. Different roofs require different repair techniques. For example, a shingle roof needs to be repaired with roofing cement or caulking. A rubber roof can be fixed with lap sealant or a rubber patch kit. Concrete flat roofs can be repaired using a caulking or roof cement.

Once you have identified the leaky area, it’s important to clean the surface of the flat roof and remove any debris that may be present. You will also want to clear any gravel that has accumulated in drainage holes or around chimneys and skylights.

For small cracks and holes, you can use a silicone-based caulking to fill them. If the hole is at a joint, you can use a lap sealant to seal it. For more serious problems, a rubber patch can be used to fix the hole. If you’re using a rubber patch, it’s important to choose a kit that includes a primer to enhance bond strength.

Performing regular maintenance on your flat roof can significantly reduce the need for costly roof repairs. Typically, it’s recommended to inspect a flat roof twice a year and after a significant rainfall. Proper maintenance also involves getting rid of any ponding water within 48 hours. This can be accomplished by adding roof drains, scuppers for a pond at the edge of the roof or automatic siphons for ponds in the center of the roof.

Window Replacement Factors That Affect the Cost of Replacement Windows

The best window replacement options meet your vision and home needs without breaking the bank. A variety of factors affect the cost of replacement windows, including style, size, material and installation.

Window Replacement

Investing in professional installation is often worth it. Skilled do-it-yourselfers can save on labor costs, but using a pro also ensures your project is done correctly and offers protection with warranties. Contact Your Home Exterior Solutions for professional help.

The frame of a window is the stationary components that enclose either the sash on an operating window or the glass in a direct-glazed window. This includes the head jamb, side jambs and sill. Window frames are responsible for keeping panes of glass firmly in place, but they also protect a home from the elements and improve energy efficiency. The right window frame will last a long time and add beauty to a home’s aesthetic.

Window frames come in a variety of styles and materials, and each offers its own unique benefits. Wood frames look traditional and offer good insulation. Metal frames are affordable, durable and easy to maintain. Vinyl is a great choice for many homeowners because it’s moisture resistant and won’t warp or require staining or painting. However, it doesn’t insulate well enough to keep your home comfortable year-round.

During a window replacement, the old frame is removed and replaced with a new one that fits your specific needs and style. Window frame replacement requires precision to ensure a tight seal and optimal operation. It’s also important to select a contractor with experience replacing windows, and who uses high-quality products to ensure longevity.

If you have signs of a faulty frame, it’s important to repair it before the damage worsens. Some signs include significant drafts, condensation between double-paned windows or visible rot or water damage. Window framing replacement is typically a simple project for experienced contractors.

Aside from function, the frame also determines how your windows will look. Some frames are plain, while others have a more decorative and intricate appearance that improves a home’s curb appeal. A good window replacement company will have a variety of frame options to help you find the perfect fit for your house and budget.

In addition to the main frame structure, you’ll need to choose any necessary hardware or accessories. These can include sash locks and stops, lift handles, sash guides, stop caps, a stool and grilles. Your installation team will help you select the right frame options to complete your new replacement windows.

Glass

As your windows age, they can begin to wear out and require replacement parts. Window parts like latches, hinges, locks and handles should be regularly cleaned to remove rust or debris and lubricated to ensure smooth operation. Window parts like glazing and weatherstripping prevent air and moisture from entering your home, improving energy efficiency. Damaged or worn seals should be promptly replaced to maintain insulation and reduce drafts.

New glass options provide homeowners with the opportunity to increase energy-efficiency, improve a view, or enhance privacy. For instance, you can upgrade your standard single-pane glass to Low emissivity (Low-E) glass that helps reflect heat and keep your home more comfortable and efficient. Other enhancements include argon gas fill that insulates between the panes for increased thermal performance, or a solar control coating to limit unwanted sun penetration and interior heat gain.

Your window replacement specialist will be able to help you select the best glazing option for your home and climate. If you live in a hurricane-prone area, consider impact-resistant windows that can withstand high winds and flying debris, as well as a storm shutter to protect your interior from wind-driven rain. Or, if you want to maximize natural light and views in your home, consider slimline windows that feature narrow sashes for a clean aesthetic.

Other popular choices include double-pane or triple-pane glass, Low-E coating upgrades or combinations, insulated sills and spacers, and laminated glass. The most important thing is to find the right blend of style, functionality and durability to meet your home’s needs.

Many homeowners try to match their replacement hardware with existing hardware throughout the house. However, it’s not always necessary, especially when mixing metal finishes. Choose a main color and use different finishes to create a complementary look, or accent with a few pieces of hardware in different colors for a more subtle look.

Design

When customers are shopping for windows, they may want to consider different styles that can match the architecture of their home. They might also want to choose a style that will make cleaning and maintenance easier. In addition, many homeowners are concerned about energy efficiency and want to know if there are options available.

Window design is one aspect that can impact the overall price of a window and can be affected by materials, glazing type, frame material, glass coatings and seals and other hardware. For example, wood frames are often more expensive than aluminum or vinyl windows. However, the increased cost for wood windows comes with the added benefit of energy-efficient features, including better resistance to weather changes and lower heating and cooling costs.

The casing, or trim, around the edges of the window helps keep the frame and sash together. The window trim can be made of wood, metal or fiberglass. It can be painted or left natural to complement the surrounding décor.

In addition to the frame and sash, some windows include screens or weep holes. Screens, which are typically woven of metal, plastic or fiberglass, provide ventilation while keeping insects out of the house. Weep holes, on the other hand, are individual openings in the window sill that allow water or condensation to escape.

Another important factor to consider when choosing a new window is its ability to open and close easily. This is important not only to ensure that the window will be able to meet a homeowner’s needs but also for safety and security reasons. Windows that are difficult to open and close can become a fire hazard, especially in an emergency situation.

Other hardware, such as a vent limiter or night latch, can help increase the safety and ease of operation of the window. These devices are designed to prevent the sash from closing too far, but they can still be opened for airflow. They can be installed on most single- or double-hung windows, sliding windows and casement and awning windows.

Some windows also feature special coatings that can reduce the amount of radiant heat allowed through the window or even reflect it back into the room. This can significantly improve a home’s energy efficiency. This type of glass is typically called Low-E and has a Solar Heat Gain Coefficient (SHGC) below or equal to 0.25.

Installation

Depending on the size of the window, the window frame can be assembled either in-place or in a separate window opening. The installation process can vary based on the type of frame, materials used in the wall system and whether the window is being installed as a new-construction or replacement window. A skilled professional will be able to help homeowners understand what to expect for the best results.

A high-quality contractor will take precautions to protect the home from debris, dirt and weather during the replacement window installation process. For example, tarps will be placed over any area where construction will occur to minimize damage. They will also keep the work area clean, sweeping and vacuuming continuously to avoid leaving dust and debris behind. They may even offer to move furniture and other decorations if necessary.

The process of replacing a window will start by carefully removing the old sash and panels without damaging the wall and frame. A utility knife can be used to cut through any sealant or caulk holding the window in place, allowing the sash to slide free. Once the window is loose, a level can be used to ensure it is plumb and level. If it isn’t, wooden shims can be added to the frame to ensure proper alignment and positioning.

With the window sash removed, the installer will add insulation to the gap between the new frame and the existing wall. Adding insulation helps prevent heat loss and cold air infiltration, saving homeowners money on energy costs. A putty knife is then used to stuff the insulation into any cracks and voids around the window, making sure not to overstuff. Then, exterior caulk is applied to seal the gap and prevent water leaks.

Once the caulk is dry, the installer can add screws along the flange of the window to keep it in place. The screws should be tight, but not so tight that they deform the frame or interfere with the sash operation. The installer will then sand any rough areas on the new frame and finish with paint, if desired.